Import Products
Products can be imported using an Excel spreadsheet with the product data in a specific format.
To start the import, go to Admin-->Products-->Import Products.
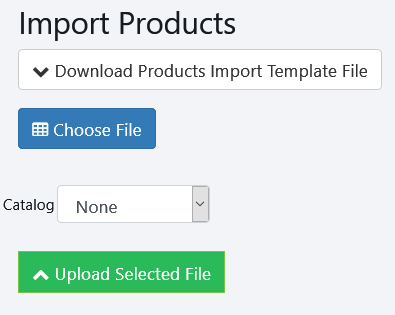
You can download a copy of the Product Import Template File in Excel format by clicking on the download button.
This will give you an XLSX file with the correct column headers and one row of sample data. The column headers must be left as is, with no additional columns added and none removed.
The template contains the following columns:
ProductSKU: required - the SKU for the product, which must be unique.
ProductTitle: required - the title of the product
ProductDescription: optional - description of the product
Price: required - product price (no $ symbol)
Cost: required - product cost (no $ symbol)
ProductType: required - the name of the product type (must be an existing type). The product type list is available at Admin-->Products-->Manage Product Types.
UseMeasure: required - product is priced by measure - must be true or false
IsTaxable: required - product taxable status - must be true or false
ReceiveAsGroup: required - inventory for this product is received as group identified (or individual). Must be true or false
Weight: optional - numeric value of weight.
ManufacturerName: required - name of manufacturer. Must be existing manufacturer. The list of manufacturers is available at Admin-->Products-->Manufacturers
MeasurePerUnit: optional - if a product uses measure, the measure per unit of the product - numeric value.
Dimension1,Dimension2,Dimension3: optional - the three dimension values of the product size - numeric value
GLSales: optional - Sales Account number for accounting
GLInventory: optional - Inventory Account number for accounting
GLCOGS: optional - Cost of Goods Sold Account number for accounting
VendorName: optional - Assign the new product to a vendor
VendorCost - optional unless VendorName is specified - the cost of the product for the vendor you are assigning it to
VendorSKU - optional - if you specify a VendorName and fill in VendorSKU, the VendorSKU will be used for this product instead of the ProductSKU. If blank, ProductSKU will be used.
VendorTitle - optional - if you specify a VendorName and fill in VendorTitle, the VendorTitle will be used for this product instead of ProductTitle. If blank, ProductTitle will be used.
Once you have the product data entered into the Excel file, click on Choose File to select the file you want to upload.
If you would like the new products to be put into a specific catalog (and optional category), select the Catalog and then Category to use.
Once you are ready, click Upload Selected File. Depending on the size of the file there will be a slight delay and then you will be given a results screen:
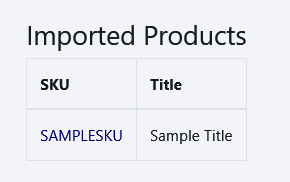
Products that were successfully imported are shown. The SKU is a link to the product detail page for that product.
If any errors are encountered, there will be a summary of each error, with the row number it occured from the spreadsheet. Note that it will stop processing a row as soon as it encounters an error, so an individual row may have more than one problem - only the first error detected is shown.

If you do encounter errors on certain rows, you can correct them and reupload the same spreadsheet. It will skip existing SKUs (it will report an error that SKU exists and move on to the next row to process).
Copyright 2018 Aegis Commerce Solutions
Toggle navigation